
Somewhere around a year and a half ago, I saw the colorblock jacket below from Roolee and was immediately inspired to hack a Kelly Anorak into my own version. I bought fabric to make a muslin, planned my final colors, decided on a bias tape...and then never made it. All of the fabric sat in my sewing room. For over a year. And that project that once got me so excited to sew was pushed to the side in exchange for things that I felt like I needed more in my wardrobe or projects for the shop.

Fast forward to a couple of weeks ago and you'll find me, with a serious lack of sewjo, not having sewn anything in over a month. Nothing was getting me all that excited to pull my machine out. I was surrounded by some beautiful fabrics (hello wools and holiday fabrics coming soon!), but rethreading my serger just seemed like more work than it was worth. Has anyone else felt that way? Sometimes I think you just need a project that makes you happy to get you back in the swing of things. And this was definitely that project.
I had cut out my pattern months ago, so getting started was quick. And once I started, I didn't want to stop! I sewed all day. My husband got home and I barely even looked up. He cooked dinner so I could keep sewing. I think he could tell I was having more fun than I'd had in a long time...probably because I couldn't stop saying "I'm having so much fun!"...

Hacking the Kelly Anorak into a colorblock version wasn't as hard as I was expecting it to be! But it did definitely take a little more time and patience. And organization - this hack essentially almost doubles the number of pattern pieces you have. If you're making the lined version....man oh man. I would recommend figuring out some sort of color coded system to keep everything straight!

I'll admit, I didn't muslin. I should have. That would have been the smart thing to do. But I needed something I was excited about sewing and a muslin definitely wasn't it! If you've never sewn a Closet Case Patterns project before, I would definitely muslin to make sure you know how your body fits in their patterns. However, I love my Clare Coat projects (here and here) more than anything and they fit me perfectly! So I decided to just sew the same size I made those two coats out of and hope for the best.
Basically, I just added a seam 6" below the armpit seam. I guessed that this is where the drawstring casing would hit on me. If I were to make this jacket again, I would probably move the seam down to 7" below the armpit seam, but measure this on yourself to be sure. Don't forget about seam allowance! I forgot to take that into consideration when measuring where the colorblock break should happen.

I took this project step-by-step and did not cut all my pattern pieces out of the fabric at once. I know that I am not a precise sewist, even when I'm trying to be! Because of that, I didn't want to cut the colorblock at exactly 6" below the arm and then sew it a little off and end up with sleeves that weren't even with the body. So I cut out the body, sewed it, cut out the placket, sewed it, and then cut out the sleeves and sewed them.
By doing this, I could adjust for any inconsistencies in my sewing. Which ended up working out well, because I think the colorblock seam on my sleeves was about 1/4" shorter than what I originally measured for the body, just based on how it all came together when I was sewing. I was able to adjust for this difference when I cut out the sleeve pieces, basing the break off of the body instead of off a precise measurement.

So, for that new seam...use your notches as reference points and take your time! I matched up notches on my paper pattern pieces in order to ensure the colorblock seam hit at the same point across the body and the zipper placket. It can sometimes be confusing to figure out how all the pieces fit together when you're looking at them flat on pattern pieces, so the notches are perfect for visualizing where the pieces are matched up.
Make your new seam perpendicular to the grainline. This will ensure that it's straight across your jacket, instead of accidentally following an angled seam. And don't forget to add your seam allowance back in! I wrote myself a reminder on each and every pattern piece to add in the seam allowance along the new edges for the colorblock seam so that I didn't forget.

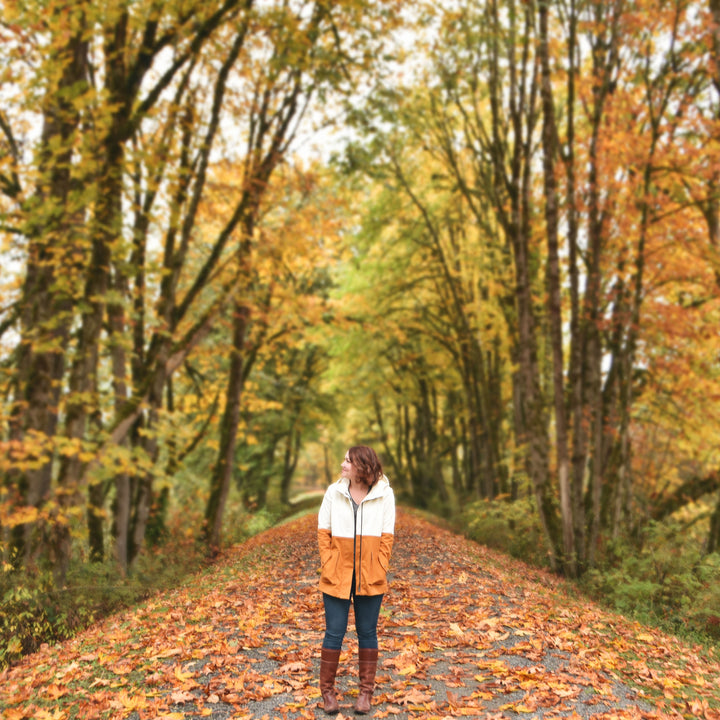
As I mentioned before, I made the unlined version of this jacket. I love the weight it unlined - it's perfect for these in-between Fall days we've been having here in the Pacific Northwest. I used our Chino Twill in Creme and Golden Brown, but I think you could colorblock with any color and it would be pretty stunning!
I used bias tape to finish most of my seams...there are only a couple that I flat felled. This was the first time I sewed bound seams and let me tell you - they are nowhere near perfect. But I learned a lot along the way and love the way this finish looks. I'll definitely be using it again when a serger finish just won't cut it!

I think this jacket can be super intimidating for some people to tackle. But like most of the Closet Case Pattern designs, as long as you take it slow, I think that even and advanced beginner could handle it! Heather also put together a really helpful sewalong, full of tutorials for the jacket, which I referenced pretty much every step of the way. If you've been thinking about sewing a jacket or a coat, I honestly think this one would be a really great place to start!
And of course, a photoshoot for the blog wouldn't be complete without my sidekick joining in on the fun...I don't think he was nearly as impressed with my jacket as I was!